If you’re running lead generation campaigns in the United States, especially those involving phone numbers, TCPA compliance is not optional.
One of the most common mistakes we see is improper setup of Jornaya, which results in missing certificates, failed compliance checks, and potential legal exposure.
This guide explains:
- What Is Jornaya (Verisk LeadiD)
- Why Does it Matter a lot?
- How it technically works
- How to Create a Jornaya form Using Growform
- How to test whether created form is assigning jornaya LeadID to every lead filling the form
- How Does the Jornaya LeadiD Workflow Work?
Explore More: How to Monitor, Protect, and Remediate Spam Likely Label on Your Caller ID?
What Is Jornaya (Verisk LeadiD) And Why Does it Matter a lot?
If you’re generating leads for a lead buyer they might ask you to verify where the leads have come from or to certify that specific legal disclosures have been met and one popular way of achieving this is Jornaya lead ID and is largely referred to as lead ID.
At its core, Jornaya is a lead origin tracking and consent documentation system.
Normally, when someone fills out a form on your website, your system records the data, stores it in a database and your CRM shows the phone number and timestamp.
In future when you run AI outbound calling campaigns, anyone can sue by denying that they never filled an online form. You can show them that they filled the form by showing the data stored in your database.
But from a legal standpoint, that’s weaker proof because this data came from your own system and the opposition party can raise its concern as the system is totally controlled by you and you can modify it as you wish. So regulators or attorneys may not see that as strong independent evidence.
Journaya is a 3rd party system and it observes web browsing sessions at the time the prospect is on your landing page, records it, timestamps the interaction and generates a unique LeadiD tied to that session.
As it all happens outside of your CRM, lead platform, and control, therefore regulators accept it as strong evidence and help you to stay compliant when you make outreach via AI outbound calling, text messages, or emails.
Journaya matters a lot in AI Outbound Calling because it proves that every lead you capture has undergone a comprehensive verification process ensuring compliance with industry regulations like TCPA or the telephone consumer protection act. It works behind the scenes documenting the consumer’s Journey seamlessly helping you demonstrate proof of compliance, minimize potential disputes, and build trust with your buyer.
How does Jornaya Work?
Let’s understand step by step, how jornaya works!
Create a Jornaya Account
- Visit Verisk Marketing Solutions site and sign up to create a Journaya Account.
- Submit a business registration request
- Verisk reviews your business and verifies your credentials to prove that your business and site is authentic and non-spam.
- After verification, you get LeadiD and receive your account credentials
- Get access to their installation JavaScript snippet
Install the Base Script
- Once you receive a JavaScript snippet, Place it in the <head> of your webpage, this will install base script in your webpage.
LeadID Generation
- When someone opens your webpage, their browser requests your web server asking for the page.
- Your web server responds to the browser by sharing page information. The browser reads this information. While reading HTML, it goes through leadID javaScript inside the <head>, downloads and executes it automatically.
- Execution generate a unique session ID called LeadID, timestamp it, associate it with the page URL, and store it in browser storage
The LeadiD Is Saved Into Your Form
- When the visitor fills out your form and submits it, your webpage captures the generated LeadiD and stores it either in a database column or your lead distribution system along with the person’s information.
- If you do not save the LeadiD before sending the lead to the buyer, you lose the compliance trail; the proof is lost.
You Pass the LeadiD to Your Lead Buyer
- When you send the lead downstream to lead buyer, a call center, CRM, and marketplace, you share LeadiD with the lead record.
- Using this LeadID, the buyer can validate the origin of lead, confirm session history, and reference the documentation if there’s a dispute.
How to Create a Jornaya form Using Growform
To create Jornaya form you’re going to need two logins here:
- one for your lead ID and
- a second one for Growform
Growform is a multi-step form Builder designed to help you get more leads from the same traffic. It’s a perfect tool for demonstrating how to verify a lead’s origin
Step 1
Go to Growform website and click sign up here, by clicking start building for free. It will take you to a new tab where you will enter your credential and sign up.

Step 2:
It will take you to a new tab where you can either enter your credentials like first name, last name, work email, and password sign up or click Sign up with Google.
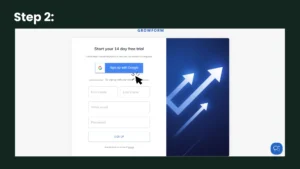
Once you’ve signed up with an email address you’re ready to go into Growform.
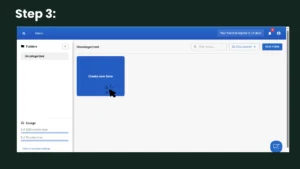
Step 3:
From the homepage, click on create a new form to start building this jornaya lead ID form. A pop up window appears.
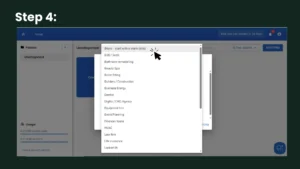
Step 4:
It is really up to you what you do from here. You can either choose a template or start from scratch because Growform offers a wide variety of pre-built lead generation form templates. To create Jornaya LeadID form, click: None – start with a blank sheet.
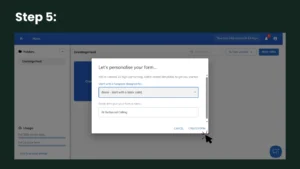
Step 5:
A new pop up window appears, enter the name you want to assign to your form like AI outbound calling or whatever you want. Now click create form.
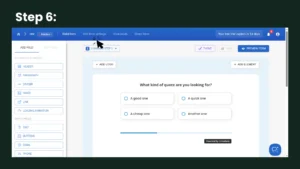
Step 6:
Now a Growform will appear with many options and at the very top right there is an option: edit form setting. Navigate to it.
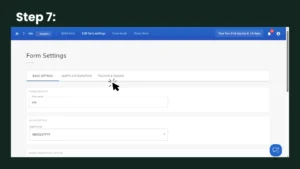
Step 7:
When you click edit form setting, Form Settings will open. Toggle the Tags and Tracking option and click it.
Step 8:
Once you are in the Tags and Tracking section, scroll down till you find the journey option.
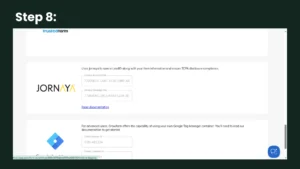
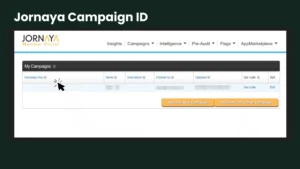
Now, here you need a Jornaya account code and Jornaya campaign ID. To grab these two things, log into your jornaya account and fetch the account key and the campaign key.

Go to Growform and paste in both of your keys in the journey tags and tracking section. Once you’ve done that please remember to save your form clicking save the form option present at the bottom of this section (you go there by scrolling).
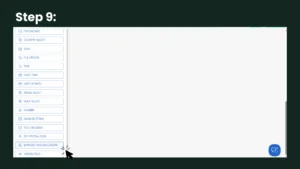
Step 9:
Your lead buyer may ask for a telephone consumer protection act or TCPA disclosure and Growform has a field designed just for this very task. If you go back to your form Builder, scroll on the left hand side through those fields and if you’ve successfully added your lead ID details you will see the field that says Jornaya TCPA disclosure. Click on it and edit the relevant prompt for all your respondents.
Testing your Growform
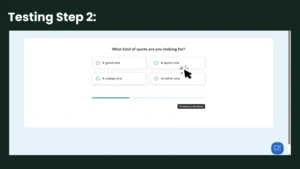
Now you’ve added Jornaya lead ID to your form there is one last thing to do and that is checking whether it works. To do that, you want to hit preview form.
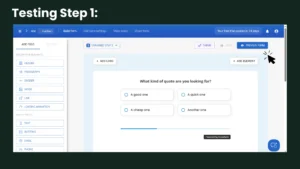
and complete your form as any regular user would. For example: In our demo form, there are option like:
- A good one
- A quick one
- A cheap one
- Another one
But in a real campaign, it could be auto insurance quote, solar installation quote, debt settlement quote, home improvement estimate, etc.
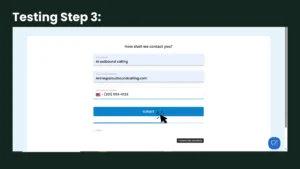
Fill in the information like your name, email ID, and telephone number. Once done, hit the submit option to submit the form.
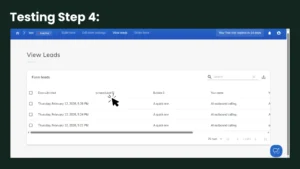
To see the Jornaya leadID is saved alongside the standard form information, go to the Growform and click view leads. This will open a view leads section that shows standard lead information along with Jornaya leadID.
How Does the Jornaya LeadID Workflow Work?
Suppose prospects see your advertisement via Facebook ads, Google ads, native ads, email campaigns, or SEO and click on it. By clicking, they arrive at a form where their information can be captured.
Where to Publish Growform
You can publish Growform in one of two main ways.
- The first option is to use Growform’s hosted link. Growform provides a direct URL and you can send traffic straight to that link without needing your own website.
- The second option is to embed Growform on your own website. For this purpose, you build a landing page using WordPress or custom HTML, copy the Growform embed code, and paste it into your webpage. When a visitor arrives, they see the Growform form directly inside your page.
Once the form is live, prospects visit and fill in it .
Visitor Fills Out the Form
When visitors fill in their information, the Jornaya script (the JavaScript in the <head> of the landing page) is already running in the background. When the visitor submits the form, Jornaya generates a unique LeadiD for that session that acts as a compliance reference for that specific submission.
LeadiD Saved
Growform automatically stores both the lead’s contact information and the generated LeadiD. Up till now, every lead in your system has its own unique identifier.
However, storing it inside Growform is not enough; you now need to send it to your internal systems like CRM or lead distribution system..
Sent to CRM or Lead Distribution System
You can connect Growform to your CRM or lead distribution system through Zapier, a webhook, or direct integration. Once connected, Growform automatically sends the lead’s name, phone number, email, and LeadiD to your CRM or lead distribution system.
Once inside your CRM, the lead is delivered to your buyer and buyer pays as per contract for each lead.
Sent Lead to Buyer
Once lead’s information is inside a CRM or lead distribution platform it is forwarded to your buyer through an API, lead distribution software, or even through manual export if needed.
Buyer Claims the Lead in Jornaya
Finally, the buyer logs into their Jornaya account and claims the LeadiD. Jornaya verifies the session record associated with that ID. It confirms that the form submission genuinely occurred. Once claimed, the LeadiD cannot be claimed again, which guarantees exclusivity.
In the whole process, never forget to include the LeadID field when sending the lead. If the LeadiD is not passed to the buyer, the compliance proof is effectively lost. The buyer needs that identifier in order to verify the submission with Jornaya. Once the buyer receives both the lead data and the LeadiD, the final verification step can occur.
FAQs about Jornaya LeadID for TCPA Compliance
What is Jornaya LeadiD?
At its core, Jornaya is a lead origin tracking and consent documentation system. Journaya is a 3rd party system and it observes web browsing sessions at the time the prospect is on your landing page, records it, timestamps the interaction and generates a unique LeadiD tied to that session.
Why is Jornaya important for TCPA compliance?
Journal is important for TCPA compliance because it proves that every lead you capture has undergone a comprehensive verification process ensuring compliance with industry regulations like TCPA or the telephone consumer protection act. It works behind the scenes documenting the consumer’s Journey seamlessly helping you demonstrate proof of compliance, minimize potential disputes, and build trust with your buyer.
How does Jornaya generate a LeadiD?
When a visitor visits your page, the JavaScript snippet in the <head> section of the webpage loads. If the visitor submits the form, Jornaya creates a unique LeadiD tied to that session, timestamp, and URL.
How do I know if Growform is saving the LeadID?
After submitting a test lead, to see the Jornaya lead ID is saved alongside the standard form information, go to the Growform and click view leads. This will open a view leads section that shows standard lead information along with jornaya leadID..
What should you never forget about the LeadID field when sending the lead to buyers?
In the whole process, never forget to include the LeadID field when sending the lead. If the LeadiD is not passed to the buyer, the compliance proof is effectively lost. The buyer needs that identifier in order to verify the submission with Jornaya. Once the buyer receives both the lead data and the LeadiD, the final verification step can occur.